Sunday, November 21, 2010

Cinnamon Rolls and Egg Bread


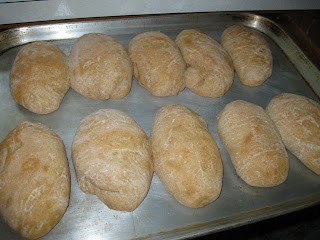
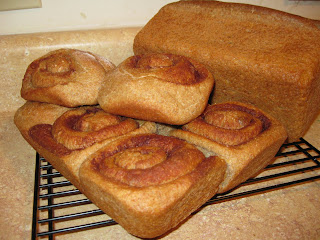
Wow! These cinnamon rolls and egg bread were three days in the making. I started the sponge on Friday evening: 1 cup water, 1 cup heated milk, 1 teaspoon of yeast, and enough flour to make a very thick soup. I stirred it all together, and put it in the fridge to make the next day, but never got to it. I pulled it out this morning, added another 1/2 cup of flour, just to make extra, a 1/4 cup of melted butter, two teaspoons of yeast, three eggs, 1 Tablespoon of sugar, more flour... I put it in the oven to rise, and took a nap. When I got up, it had risen all over the oven! That was all right; I took it out, and scrubbed the oven cleaner than it was before. :-D I rolled out part of the dough, brushed melted butter all over it., and then sprinkled it very generously with cinnamon sugar. Then I rolled it up, and sliced it, placing the slices face up in a buttered casserole dish. The other part of the dough, I shaped into a loaf. I placed them both in the warm oven again, and waited about an hour, by which time they had risen like a dream! I left them in the oven, and just turned the oven on. The rolls baked for 30 minutes, and the bread for about 50 minutes at 350 degrees.

Sunday, November 14, 2010

Egg Bread


What a great way to warm up on a chilly day - make a batch of homemade bread! I started out just throwing ingredients together yesterday: 2 1/2 cups of water, a teaspoon of yeast, and enough flour to make a very thick soup. I stirred this until it was very thoroughly mixed, and then stirred it a good deal more to get the gluten working. After letting it sit on the counter for an hour or so, I set it in the fridge overnight.
In the morning, I added 3 eggs, 2 1/2 teaspoons yeast, a teaspoon of salt, 1/4 cup melted butter, and enough flour to make a soft dough, which I then kneaded for several minutes. I placed in a well-oiled bowl, and covered it, and then let it rise in the oven for two hours. It rose like a dream! It had risen all the way up to the plate covering when I took it out of the oven, and greased the pans. Just for fun, I made one of them a cinnamon swirl loaf. Can you guess which one it is? ;-)

Wednesday, October 27, 2010

Whole Wheat Bread.


I threw this one together when I got home this afternoon. I put 2 1/2 cups of water into a large bowl with a teaspoon of yeast, and then stirred in whole wheat flour until I had a very thick soup. I stirred it about 300 times in the same direction to get the gluten working, then I covered it, and left it on the counter for a few hours while I studied, worked out, and napped. Later, I added another teaspoon of yeast, for good measure, 2 teaspoons of salt, and more whole wheat flour until I had a workable dough. Then, I kneaded it for ten minutes, sprinkling more flour on the bread or the counter as needed. Then I placed it in an oiled bowl, flipped the dough once, so it was coated with oil, and let it rise, covered, for 1 1/2 hours. Then, I punched it down, and shaped it into loaves, which I placed in my loaf pans. I let it rise for another hour, and, before I baked it, I heated the oven with a brick inside. The brick is a constant source of heat, unlike the electric oven, which turns on and off again, making the heat fluctuate. I scored the loaves, and sprinkled them with flour, and then baked them for 48 minutes at 350 degrees F. Don't forget to take them out of the pans immediately, and cool them on a wire rack, so the air can circulate around them. This prevents the loaves from getting soggy as they cool. Finished.

Friday, September 17, 2010

Gingerbread Cookies


I recently acquired a copy of The Frugal Gourmet Celebrates Christmas by Jeff Smith (1992). I was home feeling indisposed this afternoon, so I tried this recipe for Gingerbread Cookies. I didn't have enough all-purpose flour, so I substituted some whole wheat. Of course, that meant I had to add a little more liquid as I was rolling them out, but these turned out spicy, crisp, and wonderful! The spiciness is due to the sheer number and quantity of spices in this recipe: cloves, cinnamon, ginger, cardamom, and nutmeg. You can see my marble mortar and pestle in the background, because I had to grind whole cloves to make these cookies. What I found most unusual about this recipe is the tablespoon of fresh lemon juice it calls for, but I welcome any opportunity to use my trusty lemon reamer.
If you haven't checked out The Frugal Gourmet's cookbooks yet, I highly recommend them. I have tried several of his recipes so far, and have been impressed with the sheer amount of flavor in them.
These cookies were beneficial in two ways: I got a tasty treat, and my headache had even subsided a little by the time I was done baking them. Sometimes you just need to bake something.

Sunday, September 12, 2010

English Muffins


I made my tried-and-true recipe for Raisin English Muffins today. Unlike the supermarket variety, these are packed with fresh, wonderful, warm-from-the griddle flavor. I've included a picture of them from right after I cut the dough with my biscuit cutter, and set them on a cookie sheet to rise. Here they are, all sprinkled with cornmeal, and studded with raisins.

Typically, I made a sponge, and let it sit, covered, for a couple of hours on the counter while I went to do homework. Then, I added the remaining ingredients, kneaded it, and let them rise again. More homework (well, and maybe there was some napping that went on, but you weren't looking). Then, I punched it down, rolled out the dough, and made the round shapes. I let them rise again, and then grilled them on a dry griddle to glorious English Muffin perfection. Mmmmmmm!

Monday, September 6, 2010

Buttermilk Waffles


Yes, I have another waffle recipe for you! This one has buttermilk instead of regular milk, and a little bit of baking soda. The buttermilk and baking soda together make the waffles rise. Just use the regular waffle recipe, substitute buttermilk for the milk, and add 1/2 teaspoon of baking soda to the recipe, and voila! Buttermilk Waffles!
Even when you're entertaining yourself, presentation is key. Treat yourself to a feast for the eyes as well as the palate! For my breakfast, I've made a feast fit for a king with freshly cooked Jonathan apples, a dollop of organic yogurt, some crunchy chopped walnuts, and a generous sprinkling of cinnamon-sugar. Enjoy!

Sunday, August 29, 2010

Waffles


I thought I would post a regular waffle recipe here as well. I like this recipe, because it calls for ingredients that I always have around. I made these for breakfast this morning, along with some cooked apples.

Waffles
1 3/4 cups whole wheat flour
2 teaspoons baking powder
1/2 teaspoon salt
3 large eggs, beaten
4 tablespoons butter, melted
1 1/2 cups milk

Whisk together the dry ingredients in a large bowl. In another, medium sized bowl, whisk togeter the eggs, butter, and milk. Make a well in the center of the dry ingredients, and pour in the milk mixture. Gently stir them together, and fry in a hot waffle iron as usual.

Saturday, August 28, 2010

Gingerbread Waffles


This gingerbread waffle recipe came from a 1930's issue of Better Homes and Gardens magazine. I was enchanted by the idea of gingerbread for breakfast, and had to get out my mixing bowl immediately after scribbling down the recipe. They were amazing! Especially with the sliced, cooked apples, and sprinkling of cinnamon sugar with which I ornamented them before diving in.
I made several changes to the recipe, so here's my version:


Gingerbread Waffles
1/4 cup butter
1 egg
1/3 cup molasses
1 1/4 cups whole wheat flour
3/4 teaspoon baking soda
1/4 teaspoon salt
1/2 teaspoon ground cinnamon
1/4 teaspoon ground cloves
1/2 cup hot water
1/4 - 1/3 cup chopped crystallized ginger
Cream butter with an egg beater. Add egg and molasses, and beat until combined. Combine the flour, baking soda, cinnamon, salt, and cloves. Add to butter mixture, beat until smooth. Stir in hot water and chopped crystallized ginger. Pout 1 - 1 1/4 cups batter onto hot waffle iron grids. Close lid quickly. Do not open lid until done. Serve with sliced, cooked apples, and cinnamon-sugar.

Redi-Frosted Raisin Bars


I tried a recipe from the 17th Annual Pilsbury Bake-Off (1966) this evening. I was looking through my cookbooks for a cookie recipe to make after exhausting myself studying. I thought this spicy recipe for "Redi-Frosted Raisin Bars" sounded like just the ticket. These bars have a delicious, crumbly texture, and are spiced with nutmeg, cloves and cinnamon. The raisin and brown sugar mixture is cooked on top of the stove for a few minutes before adding the flour, baking powder, soda, and vanilla. I was lucky enough to find a jelly-role-pan-sized cookie sheet with sides at the Salvation Army last summer for 50 cents, so I poured the batter into that, and then sprinkled the spiced brown sugar topping on it. The only change I made to the recipe was to cut down on the cinnamon from 1 tablespoon to 1 teaspoon in the topping. The batter already has a teaspoon of cinnamon in it, so these bars have plenty of lovely spice flavor without the tablespoon of cinnamon.

Saturday, August 7, 2010

Bean Pot Soup Tureen


I love making baked beans. Problematically, I've been making them in my crock pot, so they don't brown properly. Therefore, when I saw this antique bean pot at a consingment shop, I was intrigued. I thought it was a bit small though for a batch of beans, so, as it was $15 anyway, I let it go.
A short while later, I was at the Salvation Army with some friends, and found another bean pot, made by Three Crowns, and sporting the appropriate number 3 on top of a crown in blue. That was $7.50, but again, I didn't buy it. It wasn't as nice as the one from the consignment shop, which even came with a soup ladle. The next time I was at the SA, I found that someone had snapped it up, which was probably wise, since internet prices for the 3 Crowns item run right around $40.
When I learned that the consignment shop was having a 50% off sale, I decided to meander over, just to see if they still had my bean pot. They did! I got the nicer bean pot, which turns out to be McCoy, for $7.50.
I love it! I was even inspired to finish up this quilted table runner to go underneath it. I can't wait to serve guests from this lovely bean pot soup tureen.

Friday, July 30, 2010

Black Magic Chocolate Cake


After my jam-making escapade, I decided it was time for some dessert. I tried the Black Magic Chocolate Cake Recipe with Peppermint Frosting from The Good Housekeeping Cookbook (1949).
Be forewarned that this is an exacting recipe, unlike modern recipes. It instructs, for example, to mix the cake batter with 150 strokes, and then goes on to explain what a "stroke" consists of. Nonetheless, it is well worth a try!
This cake is nice and light, with a magnificent flavor. I noticed, however, that it left a slightly metallic aftertaste, though I was the only one who noticed. I attribute this to the fact that there's nothing to neutralize the 1 teaspoon of baking soda called for in the recipe. If you try the recipe, I recommend substituting part of the milk with buttermilk to avoid this problem. I will definitely be trying this recipe again!

Strawberry Kiwi Jam


I made one more batch of Strawberry Kiwi Jam yesterday morning, to roaring success. (The jam in the background is Gingered Rhubarb Jam that I made earlier this summer.) Here's the recipe, in case you'd like to try it:

Strawberry Kiwi Jam

1 heaping cup peeled kiwi, crushed (I used a potato masher.)
1 heaping cup hulled strawberries, crushed
2/3 cup freshly squeezed orange juice
1/3 cup freshly squeezed lime or lemon juice
1 (1 3/4) ounce pkg no-sugar-needed or light pectin
2 cups sugar
1/4 tsp. butter

Combine kiwi, strawberries, orange juice, and lime or lemon juice in a large saucepan. Combine pectin with 1/4 cup of the sugar. Gradually stir pectin mixture into fruit (I used a wire whisk, so the pectin doesn't lump up.), and add 1/4 tsp. butter. Bring to a boil over high heat, stirring frequently. Add remaining sugar and return to a full rolling boil that cannot be stirred down, stirring constantly. Boil hard for 1 minute, stirring constantly. Remove from heat.
Carefully ladle into hot jam jars, leaving 1/4 inch head space. Screw on two-piece lids unti firmly secured, but not too tight. Process in a boiling water canner for 10 minutes. Remove jars and cool. Store in a cool, dark place for up to 1 year. Makes about 4 half pint jars.

Wednesday, July 28, 2010

Kiwi Jam


I was lucky enough to stumble across kiwifruit at $1 per pound, so I bought four pounds of it, and canned two batches of jam: Strawberry Kiwi Jam, using strawberries from our garden; and Pineapple Kiwi Jam, using purchased pineapple juice. It was great fun to watch the mashed fruit turn into delectable 70s-red and -green jam. I ended up with 9 half pints of jam, and I still have enough for another batch of Strawberry Kiwi Jam. I know what I'll be doing tomorrow!

Sunday, July 25, 2010

Periwinkle Blue Tart Shell


I found this beautiful periwinkle blue tart shell in an antique shop the other day, but there was no price tag. I had to have a friend pick it up the following day once the clerk had priced it. It was worth the trouble! Just see how lovely this Cranberry, Raisin, and Walnut Tart looks from Stephanie Donaldson's The Country Store (1996).
I began with "Pastry for 11-Inch Tart" from The Good Housekeeping Step-by-Step Cookbook (1997), and, since my pastry shell is larger than the 10" shell called for in Donaldson's recipe, I just added extra fruit. Because navel oranges - the variety largely available in today's supermarkets - have a particularly bitter taste, I substituted tangerine rind for the orange rind called for in the recipe, and added a splash or orange juice instead of brandy.
This tart will make a delicious dessert to our dinner of roast beef, boiled potatoes, and fresh-from-the-garden green beans.

Friday, July 23, 2010

Warm Chicken, Spinach and Feta Salad with Tomato Focaccia


What could be better on a hot summer day than a salad rounded out by a slice of fresh bread?

This morning, I made "Warm Chicken, Spinach, and Feta Salad" from The Good Housekeeping Step-by-Step Cookbook (1997), and Tomato Focaccia from Sunset's 1993 Recipe Annual. With a side of sectioned oranges, and a Mixed Berry Pie (Sunset 1993) for dessert, it was a refreshing summer midday meal.

Although the Focaccia recipe calls for all-purpose flour, I used whole-wheat, because a) it has much more flavor, and b) it's much more healthful. Using whole-wheat flour is a winner for both taste and health. If you don't like the taste of all whole-wheat flour, subsutitue one cup whole-wheat for part of the all-purpose flour. It will add health benefits, while still retaining the white-flour flavor and texture to which you are accustomed.

Because I started the focaccia dough this morning, I didn't have time to let a sponge work in the fridge over night, so I let the dough rest and rise for an hour before I added all the flour: Before you add all the flour, add only enough, so that the dough is still very sticky, and stirrable with a spoon. Then, let it rise for an hour. This will still soften the wheat and get the yeast working. Then, knead in the remaining flour, and continue as usual.

The first photo shows the Tomato Focaccia baking in the oven. In the second photo, you can see the focaccia rising under plastic wrap in a jelly roll pan.

In the background is my antique Pyrex mixing bowl. What a great find! This bowl is the perfect size for mixing bread. My favorite kind of bread is fresh bread, so I'm unlikely to use a bigger bowl than this one for bread making.

Thursday, June 3, 2010


These are the bratwurst buns, baked.

I took them out of the fridge in the morning, and added:

1 tablespoon sugar
1 Tablespoon melted butter
1 teaspoon salt
2 cups white flour

Mix thoroughly, and then add:
As much whole wheat flour as you need to make a moderately stiff dough that is easy to work with, but not dry. Knead about five minutes by repeatedly folding the dough over, and turning it a quarter turn, and folding again.

Place dough in an oiled bowl, and flip the ough over once to coat with oil. Cover with a plate or plastic wrap, and set in a warm place to rise for 1 - 2 hours. I set my bowl on top of a warm gas stove, in which someone was baking granola. In about an hour, it had raised nicely.

When the dough has risen, punch it down to remove the air bubbles, and shape into 10 individual bratwurst (or hamburger) buns. You can make 12 if you want the buns to be smaller. Allow the buns to rise in a warm place, without covering this time. When the dough has risen, bake in a 400 degree oven for ten minutes, and then turn the oven down to 350 and bake 5 - 10 minutes longer.

I like to bake bread with a brick in the oven for a continuous source of heat. For this method, preheat the oven with the brick in the oven. This heats the brick, and is a more continuous heat source than the oven.

For crustier breads, place the brick in a pan. When the oven is preheated, place the loaves in the oven, and throw a handful of ice into the pan with the brick. Close the oven door quickly. The steam from the ice creates a nice crust on the loaves.

Happy baking!

Sunday, May 30, 2010

Hamburger and Bratwurst Buns

I started a batch of dough to shape into buns for grilled bratwursts. Because I like to add milk to my hamburger and bratwurst buns, the sponge for this recipe takes a little longer to stir together than most of my bread recipes. You have to scald the milk first.

I start with a sponge for my bread recipes. The sponge for hamburger and bratwurst buns is as follows:

Sponge

Dissolve in a large bowl:
1 teaspoon yeast
in
1 cup warm water (about 110 degrees F.).
Scald
1 1/4 cups milk
Cool the milk, and pour it into the yeast mixture. Next, stir in:
2 cups whole wheat flour
until thoroughly combined.

You should end up with a mixture about the thickness of pea soup. The purpose of the sponge is to soften the wheat in order to make a finer-textured bread that isn't crumbly, as homemade breads, especially whole-grain ones, would otherwise be. Don't add any oils or salt at this point, as these inhibit rising.

Cover the sponge with a plate or a sheet of plastic wrap, and refrigerate for several hours. I'm about to put mine in the fridge, and finish adding the ingredients tomorrow.

Until then!

The joy and simplicity of baking bread

I love to bake bread!

The comment I hear most is, "Doesn't that take a lot of time?" As a graduate student pursuing my PhD in a field totally unrelated to food, I can tell you: no, it doesn't take a lot of time. I like to start a batch of bread on Friday evening (which takes about two minutes, including the time it takes me to get my bowl out of the cupboard), and then bake it on Saturday morning. If I don't have time Saturday morning, I bake it another time. It's purely a matter of convenience. Most of the "time" needed for baking bread is just waiting - waiting for the bread to rise, waiting for the bread to bake... The bread does all that on it's own. (Well, you DO have to put it in the oven.) I just go and do my homework.

It is incredibly rewarding to sink one's teeth into a steaming slice of fresh bread after several hours of writing papers!

Right now though, I'm home for summer vacation, and the family is having bratwursts to celebrate Memorial Day tomorrow. I think I'll go start a batch of homemade bratwurst buns!